Page 1 of 3

Z1R BUILD

PostPosted: Fri Dec 08, 2023 1:23 pm
by John H
After 33 years it's time to give my 78 Z1R a new life. It's not going to be a 10 restoration but will be nicely done up when it's finished. Not much to explain but will try to make it interesting for those who enjoyed the Kawasaki 4's. My first of several was a 72. Probably the last will be this Z1R. So here we go. :D
IMG_5043 copy.jpg
IMG_5043 copy.jpg (235 KiB) Viewed 19658 times

Re: Z1R BUILD

PostPosted: Sun Dec 10, 2023 10:59 am
by John H
I didn't think much about all the different versions of the Z1R when I purchased this one, so after searching for brake rebuilding kits I find that there were several versions. Starting in late 77 with the 1978 Z1R D1 model there were several minor parts variations. Some changes were to improve the bike while others were requirements to meet vehicle standards of other countries. Of course, the most popular of all was the 78 silver model. By 79 the Z1R emission std' required a new head and air box along with a choice of Ebony black paint. Another change was a 19" front wheel which improved handling.
As it turns out, My bike is titled as a 78. The motor has not id stamped numbers and the paint schemes is 1979 Ebony 'black'.
Well, you can see where I'm going with this build. It may be some kind of a transition bike, then again it may just be a bitsa bike. We'll see.

Re: Z1R BUILD

PostPosted: Thu Jan 04, 2024 10:52 pm
by John H
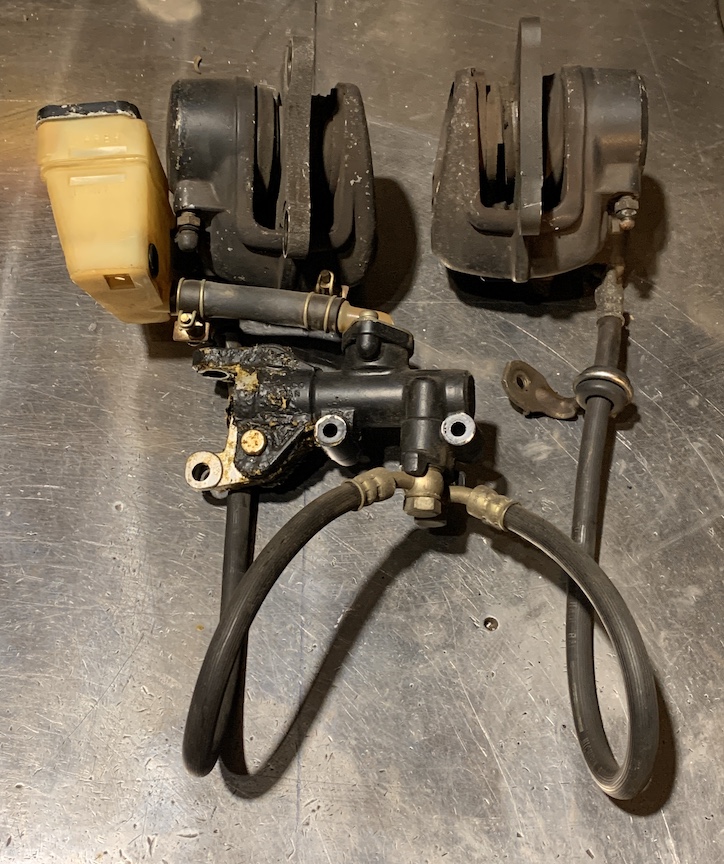
Holidays are over and time to get back on this project. More disassembly indicated more problems. I started with the brakes since corrosion and brake fluid was evident where it shouldn't be. The early Z1Rs had a cable operated front master cylinder with a 5/8 piston. Rebuild kits are available but not the master cylinder. The few I have found are corroded as mine is. Later models had the master cylinder on the handlebars.
Brakes front.jpg
Brakes front.jpg (282.71 KiB) Viewed 11090 times

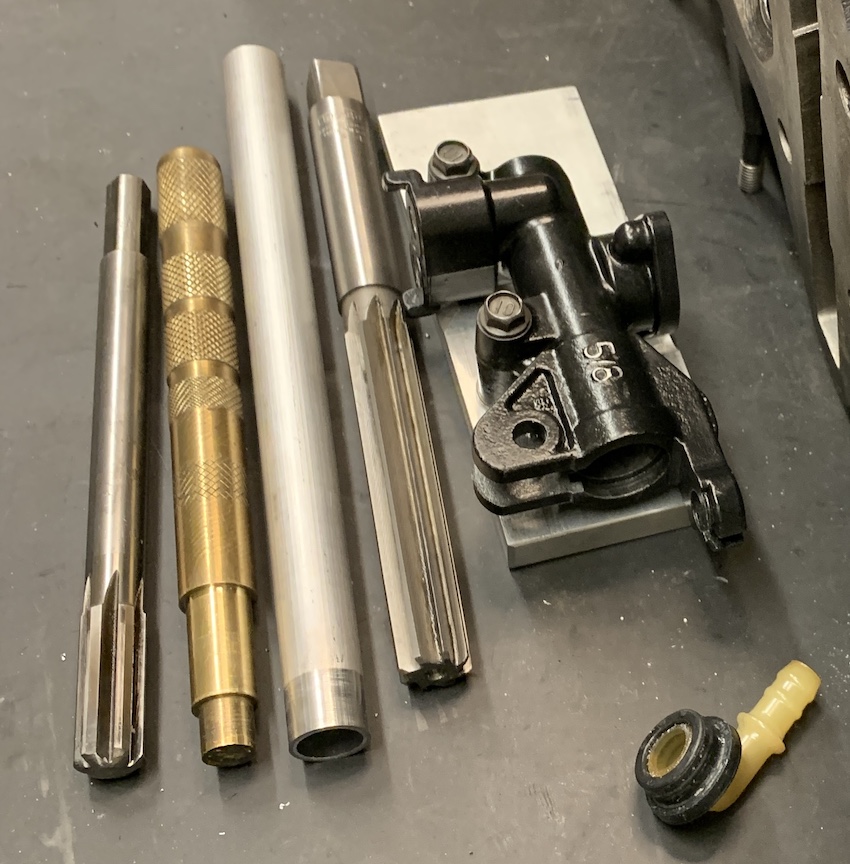
I had one option and that was to bore, sleeve and hone it, so I did. One down, one to go and it's another unusual version.
Master Cyl re-sleeve.jpg
Master Cyl re-sleeve.jpg (233.77 KiB) Viewed 11090 times

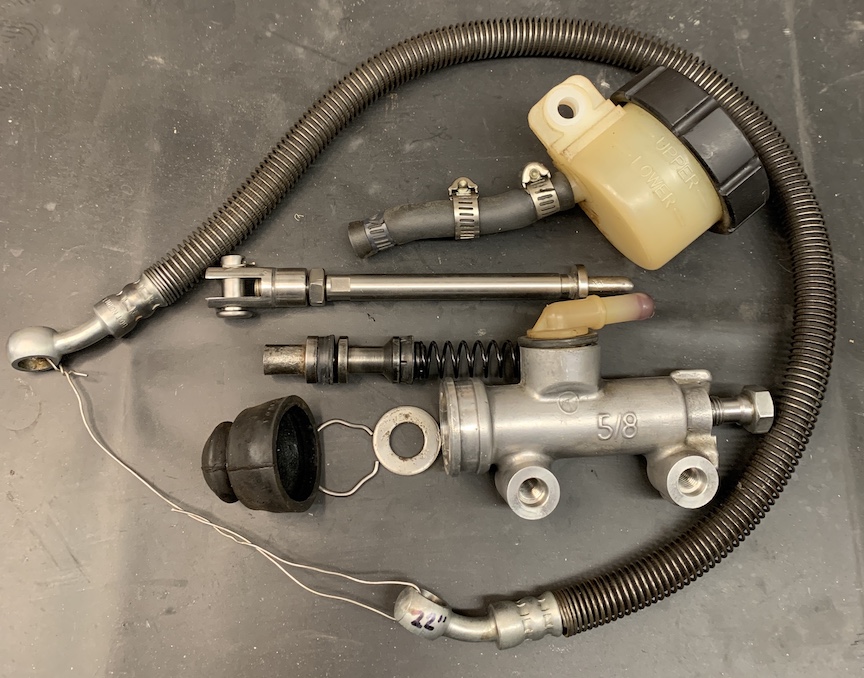
The early Z1Rs had a master cylinder with a remote reservoir. The bore is the same as the front master cylinder but the rebuild kit is different. So, the next step it to sleeve as the bore is also pitted. :P
Brakes rear.jpg
Brakes rear.jpg (227.18 KiB) Viewed 11090 times

Re: Z1R BUILD

PostPosted: Fri Jan 12, 2024 6:09 am
by Lotus54
What material are you using for sleve?

Re: Z1R BUILD

PostPosted: Sat Jan 13, 2024 8:03 am
by John H
The sleeve is aluminum 2024-T3. 6061-T6 would have been ok too. I bored and reamed the piston and then turned the od of the tubing to fit using loctite. I finished of the bore off with a 5/8 reamer.

Re: Z1R BUILD

PostPosted: Sun Jan 14, 2024 5:18 pm
by Lotus54
Thanks, I will keep that in mine.
Years ago I had a Europa master cylinder re-sleeved, but it would have been better to do it myself I think (now).

Re: Z1R BUILD

PostPosted: Tue Jan 16, 2024 12:00 am
by John H
The brakes are finished so I disassembled the motor. Starting with the head, 2 of the valve shim bucket were stuck in the head. Several hours of soaking with Kroil, heating and cooling and they finally cam out without damaging the head. The surface of the head was heavily pitted and after attempts of lapping I realized the head was warped. Further inspection showed that 2 of the cylinder/head studs were cross threaded keeping the head bolt (which is a cap nut) from seating. This would not allow the head to be torqued down properly. A friend who has a head resurfacing machine finished the head by removing .005".
warped head.JPG
warped head.JPG (188.42 KiB) Viewed 9849 times

The seats were re-cut with the Neway cutter and valves refaced and lapped. This means all the valve adjusting shims have to be replaced or valve stems need ground to re-establish the correct clearance. Lapped the valves and head is finished.
Valve seat cutter.jpg
Valve seat cutter.jpg (219.95 KiB) Viewed 9849 times

Re: Z1R BUILD

PostPosted: Thu Jan 18, 2024 3:29 pm
by Lotus54
I never thought of lapping valves that way. Since none of the ‘regular’ suction cup lappers seem to hold the valves well anymore (old ones did great)- I will try it next time.

I have a Snap-On stud remover/installer (metric)- just in case

Re: Z1R BUILD

PostPosted: Sat Jan 20, 2024 10:31 am
by John H
Now with new cylinder studs and threads repaired in the crankcase I chose 12 head nuts from an assortment of several. While spinning these onto the new studs I noticed a wobble in several of them. Not a good combination for torquing down the head properly. So I screwed these onto a threaded adapter in the lathe and re-cut 12 so the surface will be true to the surface of the head. The 4 outer head bolts have copper sealing washers.
HEAD BOLTS.JPG
HEAD BOLTS.JPG (315.06 KiB) Viewed 9483 times

The crankcases have now been carefully inspected, blasted, de-burred and a tap run through all threaded holes. All oil holes have been rodded out and flushed. With two cycles in the dish washer they are now squeaky clean and waiting for the Spraymax 2-pak paint to arrive.

Re: Z1R BUILD

PostPosted: Sun Jan 21, 2024 6:48 pm
by John H
I've wanted to add this rotating attachment to this bike stand for a long time. I still need to make a crank to insert where the hand wrench is now. The engine adapter as you see it now is just for holding and rotating the motor during the painting process. I can roll the stand out into the main shop to paint then roll it back in the warm room to cure. A different adapter will be used to hold the motor for the assembly.
Engine Stand for painting.JPG
Engine Stand for painting.JPG (261.22 KiB) Viewed 9364 times